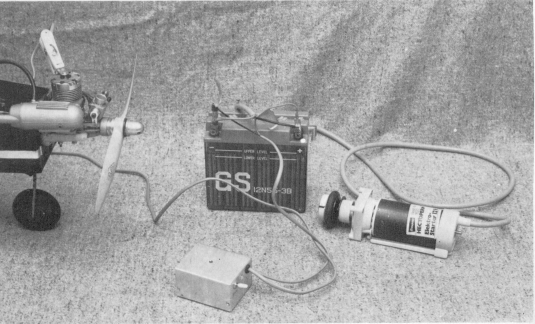
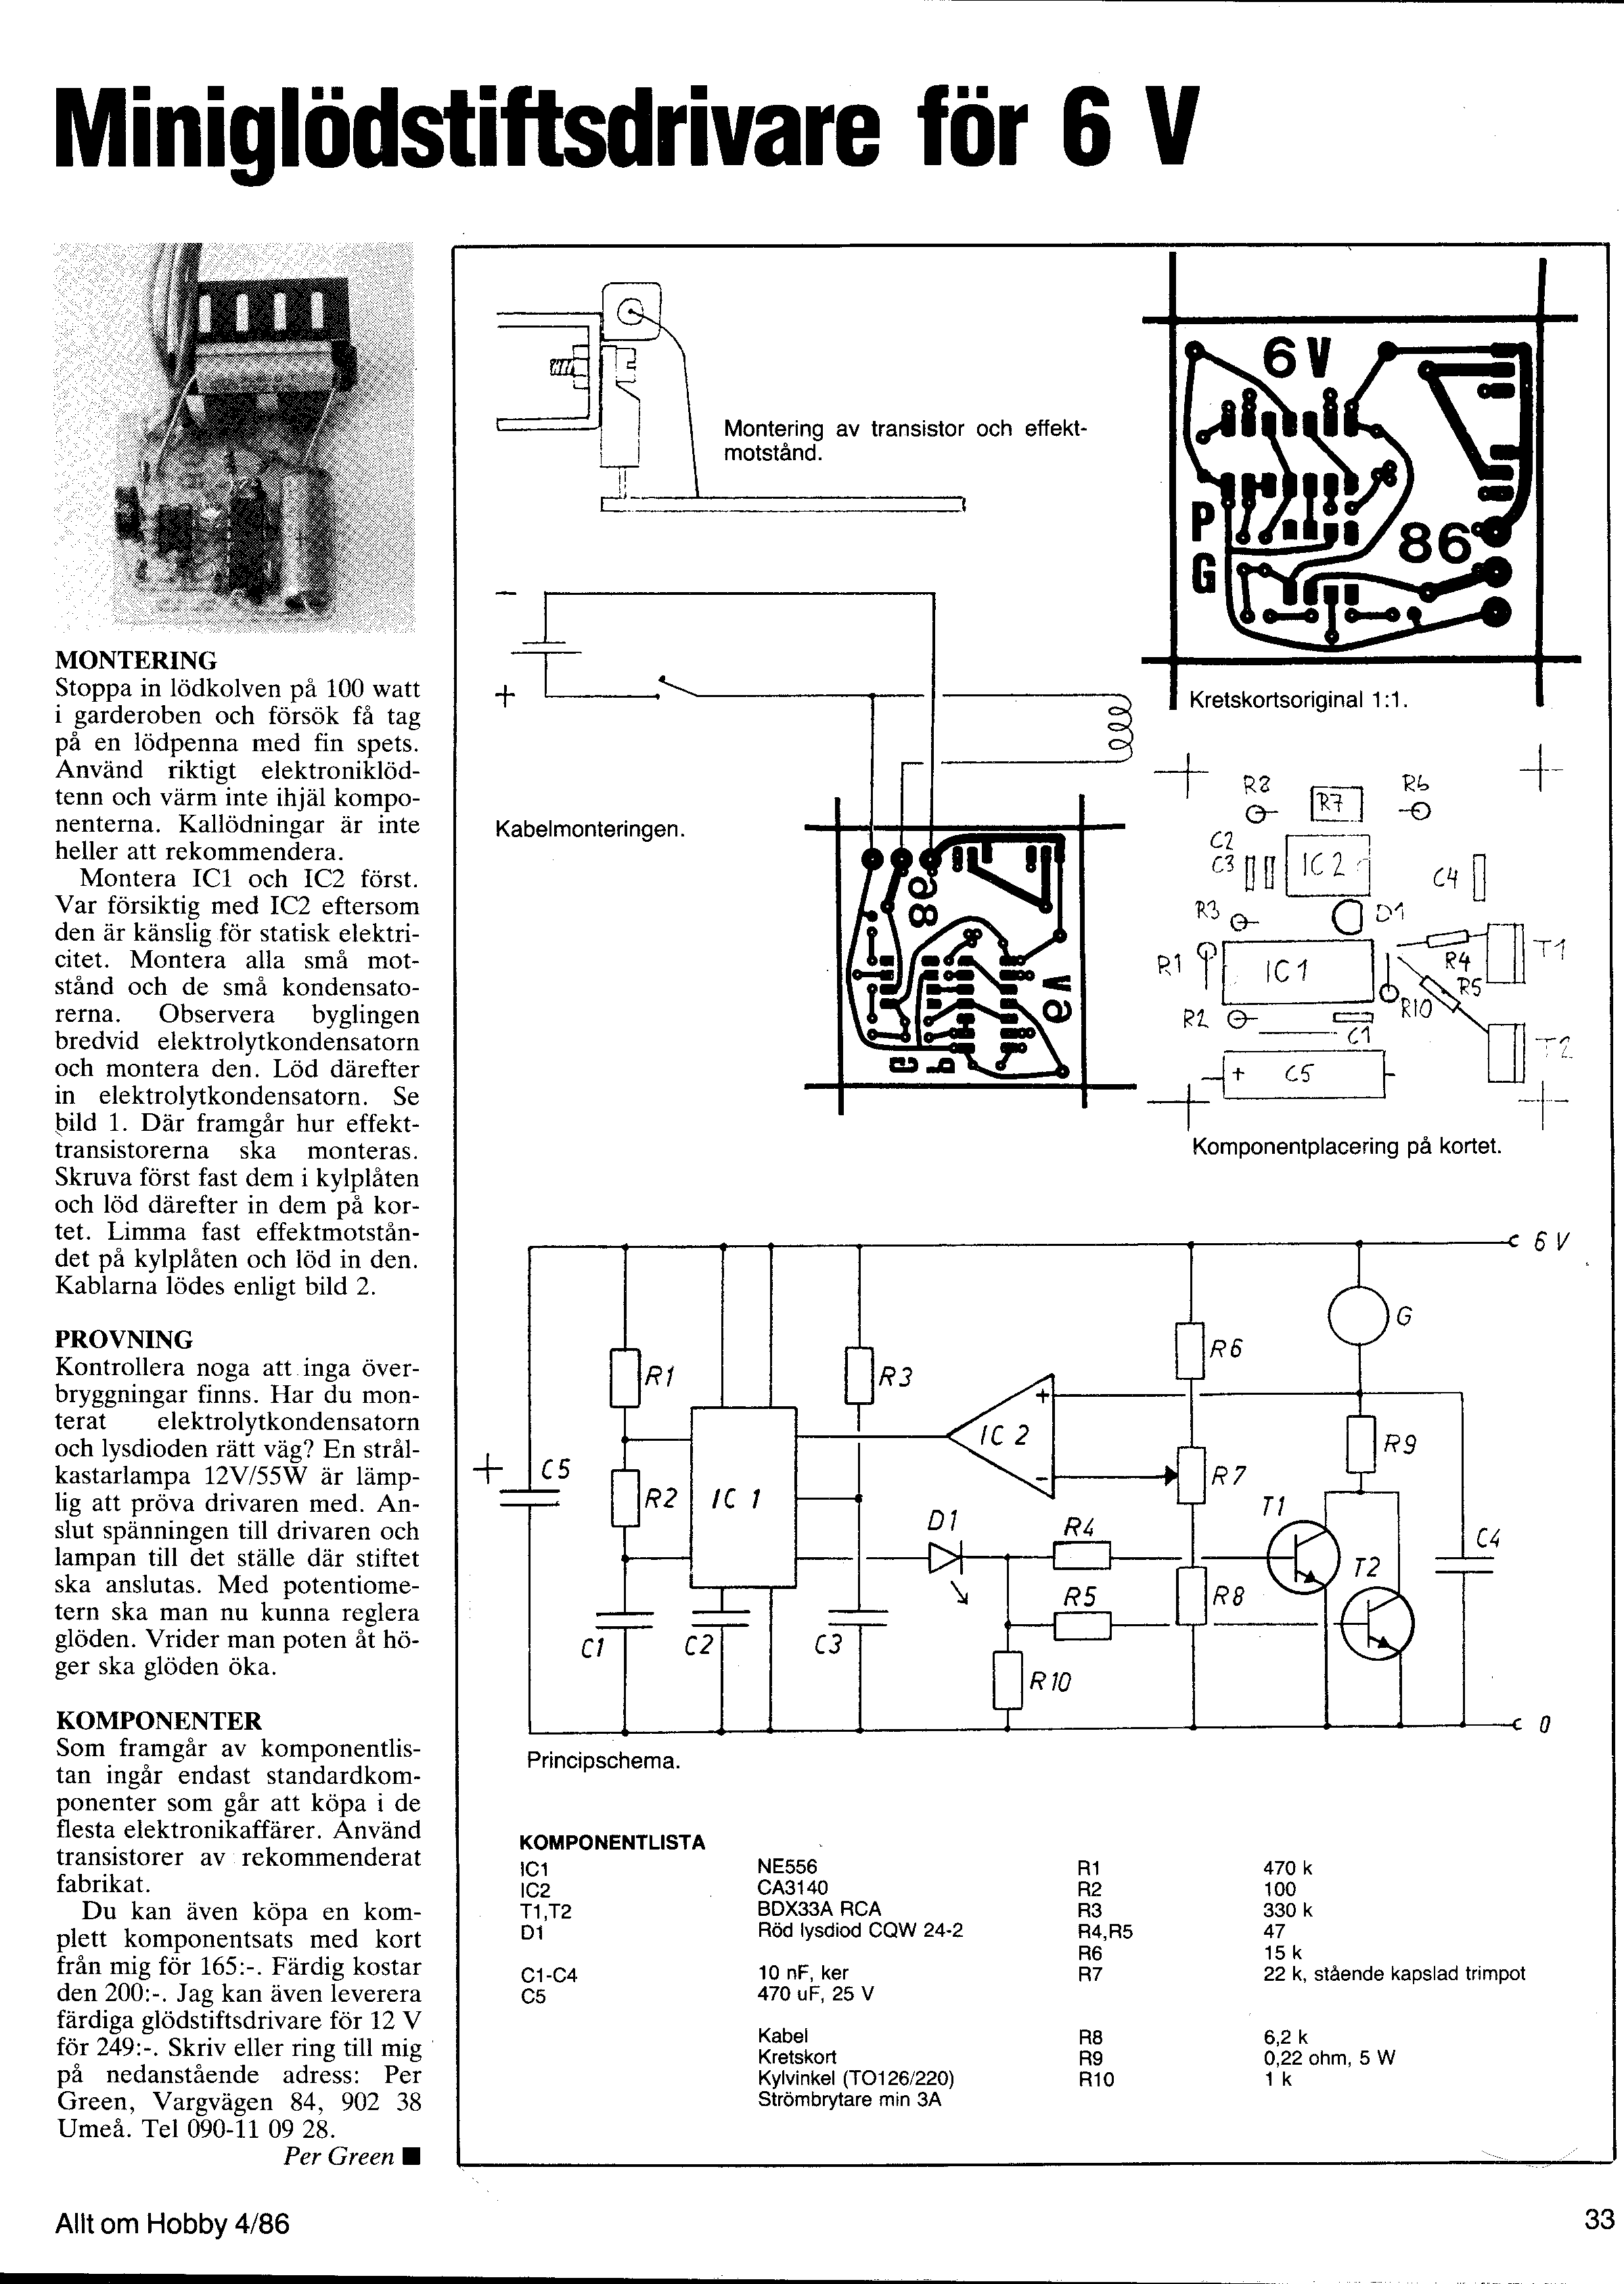
Fig 1. Photo of the glow plug driver and start apparatus.
Start of model motors
with a glow plug gives often problem, because of the glow plug cools if it
becomes wet. An elegant solution of the problem is shown here. The resistance
at the glow plug is recognize and controlling a tension aggregate that working
with pulse width regulation. As a result you get almost a constant temperature
on the glow plug.
Have you trouble with a wet glow plug? Do you use inverted motor montage?
Is the motor difficult to start? Then you need this apparatus, which always
looks after that the glow plug keeps the right temperature. Because electrical
start apparatus for 12 V becomes more and more popular, you can use a 12
V accumulator and not have to use a separate glow current battery. The normal
glow current source for glow plug to model engines has the tension 1,5-2
V. However, this has the disadvantage that if the plug became wet the plug
stops to glow and difficulty to start arises. If you using higher tension
with simple stabilizing and adjusting the glowing so that the motor ignite,
the plug will be to hot when the motor starts and the glow spiral in the
plug burns up.
Pulse controlling solves the problems
The solution on the problem is the glow plug driver. It works with the tension
12 V and let through current to the plug in short pulses, about 0,1-0,5 ms
and with long breaks, about 20 ms. The glow plug lying in a bridge connection
and during the current pulse the electronics recognize the glow plugs resistance
(as depend on the temperature). If the plug tend to get colder (the engine
is wet) the current pulse length increase. Inversely; if the plug tend to
get to hot (the engine ignite and the combustion heat the plug) the current
pulse length decrease.
On the market there is some
apparatus of the described type above, but these are suffering from quite
big weakness, which we has eliminated!
1) If the glow plug became short circuit or if the apparatus is connected
to the battery pole inverted, the apparatus will be destroyed. We have eliminated
this through the fuse S1. And if the plug became short circuit so long as
the electronics of thermal reason could be damage, the fuse S1 will melt
also. If it polarized wrong the diode D1a and Dlb will conduct and the fuse
blowing.
2) If an error arise in the pulse generator, the switch transistor become
conduct and the glow plug been destroyed. In this apparatus phase inverting
takes place in the step T5 and if an error occur the current to the plug
cuts off entirely.
3) The increase of the current pulse time is to big and on an inverted motor, there fuel and oil run down on the plugs glow coil, will some part of the coil to lie in the air and some part in the fuel, there it cools. With to long current pulse time will some part of the glow coil as lies in the air to burn off. In this described apparatus, the current pulse time will not be longer than that a plug with a thin coil will keep also.
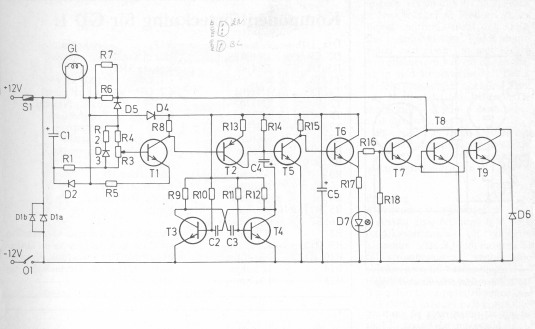
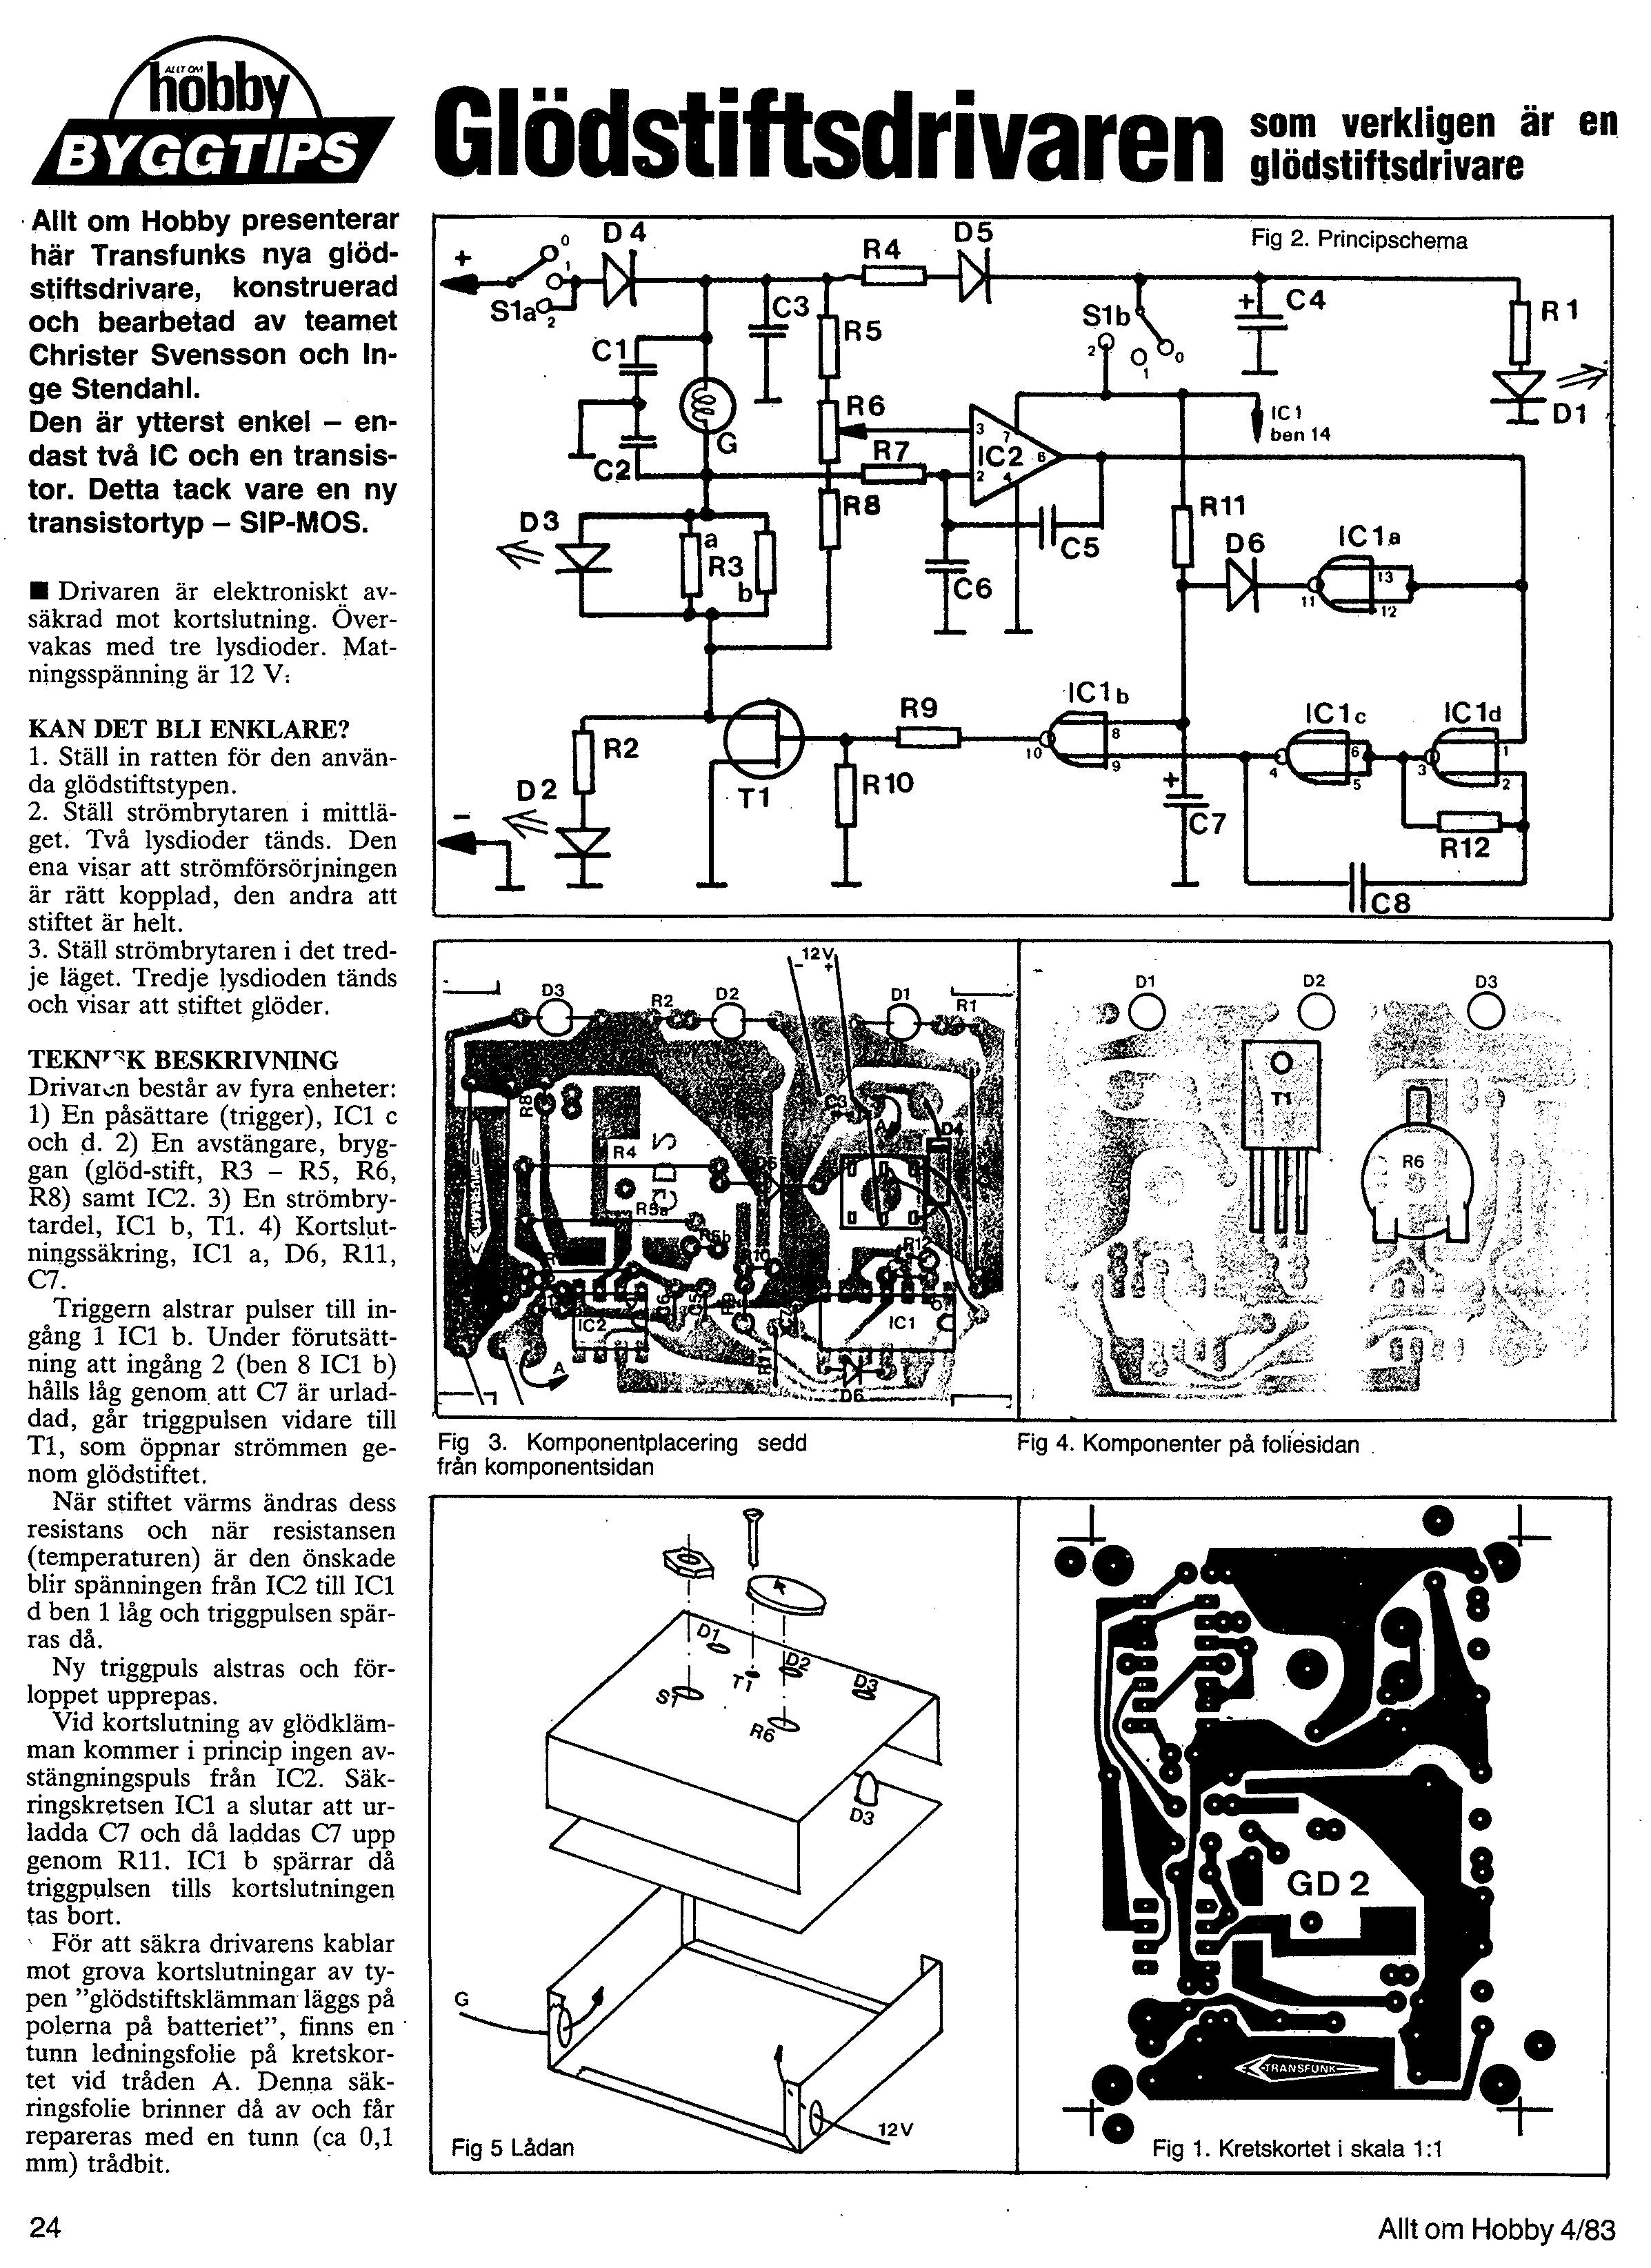
Fig2. Principle schema for the glow plug driver.
Function
We distinguish, in the description below, on the two-condition pulse then glow current is on and pause then the current is off. The function is clear from fig 2. The current to the glow plug is switching by T8/T9, as is parallel connected. The current intensity under the pulse is about 10 A. Ignition and extinction of the glow plug controls by T5 in principle. When T5 is saturated is the glow current switched off and the electronic struggle for to saturate T5 because of R14. This design protecting the glow plug if an error occurs. See point 2 above. T5 can be controlled in its turn from two directions. Either from the astable multivibrator with the transistors T3 and T4, there the negative flank in the multivibrators pulse switch off T5, witch gives glow current. Or so happened this from T1, T2, at which T5 conduct when T1 conduct. However, T1 can only saturate T5, i.e. switch off the glow current. Thus, we can say that if T1 conduct, we get no glow current. We can get glow current when T1 is switched off not more than during that time as it takes for C1 to be uncharged, after that the multivibrator T3, T4 has turned so that T4: s collector has become low. This time can be adjusted with C4, R14 and in our GD1 is the time dimensioned for max 2 - 3 ms, which become the longest pulse the glow plug can get and gives the security according to point 3 in the introduction. During the pulse, current flows also through the light emitting diode D7, as accordingly indicate that the plug get current. When the pulse time increase D7 will lightning more intensive. We have chosen a diode with red light for to get good contrast when you are outdoors. C5 charges during the pause and during the pulse D4 prevent C5 to uncharge. Thus and henceforth will the tension over C5 to be 12V. The bridge (Wheatstone bridge) consists of the both branch Gl, R6, R7 and Rl, R3, R4. The capacitor C1 must be because that the current through the bridge switch on and off all the time. C1 wills charges up under the pulse, which cause Rl to switch to +12V. C1 will uncharge instantly by D2 under the pause. A simplified diagram over the bridge is show in fig 3.
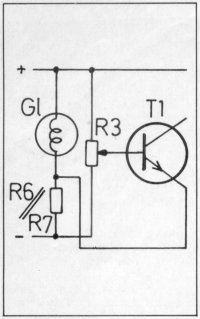
Fig 3. A simplified scheme over the bridge.
The bridges function is as follows: We has set desired glowing at the plug
with R3, which is equivalent to a certain potential on the base T1 relative
minus. At the pulses beginning, after start from the multivibrator, the plug
is cool and its resistance is low, which doing that the potential on the
emitter T1 is higher than on the base. T1 is switch off! Within a time of
max 2 - 3 ms, the plug becomes more and more hot through the glow current
and the resistance increase. The potential on the emitter T1 sink. When the
plug has right temperature has the potential on emitter T1 sank so low that
T1 starts to conduct and then conducting T5. The glow current stops however
until it starts once more of the multivibrator T3, T4.
Component list for GD 1:
D1a, D1b,
D2, D4, D6 ... IN4001
D3, D5 ....... IN4148
T1, T3,
T4, T5 ....... 2N3704
T2 ........... 2N3702
T6 ........... BC338
T7, T8, T9 ... TIP33
D7 ........... SR103W
R1 ........... 68 ohm
R2, R18 ...... 39 ohm
R3 ........... 500 ohm trimpot, Helltrim
R4 ........... 150 ohm
R5, R13, R16 . 22 ohm
R6, R7 ....... 0,27 ohm, 5 W
R8 ........... 270 ohm
R9, R12 ...... 4,7 kohm
R10, R11 ..... 100 kohm
R14 .......... 22 kohm
R15 .......... 1 kohm
R17 .......... 100 ohm
All resistors are Resista SK-2 (1/4 W) unless otherwise stated
C1, C5 ....... 1000 µF 15 V
C2, C3 ....... 0,1 µF tantal
C4 ........... 0,22 µF tantal
O1 ........... toggle current switch
G1 ........... glow plug
S1 ........... fuse 5 A
Fuse holder
Box TEKO 2/B
PCB GD1
Glow plug clip
Cable
F:a Transfunk
Kerstinbodagatan 12
SE-641 00 Katrineholm
Phone: +46 (0)150/188 66.
SWEDEN
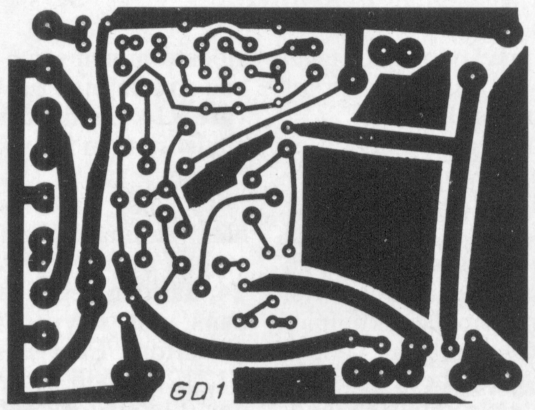
Fig 4. PCB. Scale 1:1 = 51 x 67 mm.
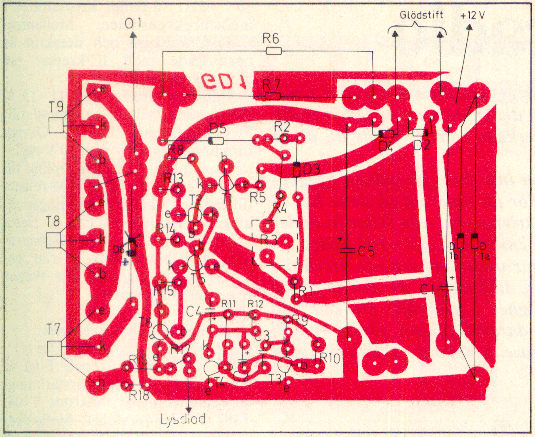
Fig 5. Placing the component on the PCB.
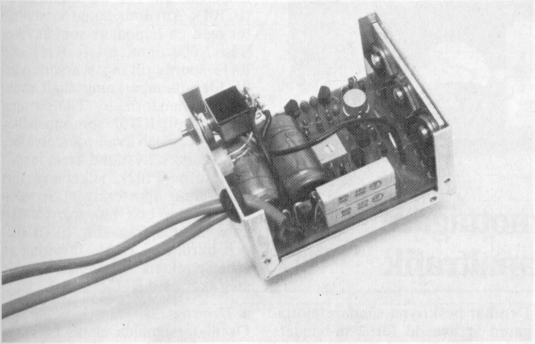
Fig 6. The lid at the glow plug driver is taken off here for to show the mecanical structure.
Mechanical structure
Use a small standard box
Teko 2B to build the glow plug driver into. Adjust the printed circuit board
in size so that it fits in the box. Bevel the boards edges 45° on all
sides for to avoid short circuit with the cover. Drill hole Ø 1,2
mm for Cl, C5, R3, R6, R7, Dl, D2, D6, T7, T8, T9 and wires for glow plug,
accumulator connection (+12 V) and wire to Ol (0 V). Drill remaining hole
Ø 0,8 mm. Drill the hole for +12 V in the middle of the foil surface.
Mount the component. Put R6 over R7. Bend the legs to T7, T8 and T9 so, that
the transistors body can be screw in the boxs gable and that the outer legs
go free for the screws to the cover. All the little opposite ... . Mount
D3, D5, Dl and D6 lying and the others diodes standing. See fig 5. The dot
part of the foil area reinforces with a blank wire 1 mm, as you solder along
the foil at T7, T8, and T9 to R6, R7. Drill hole on the one gable of the
boxs under part for O1, D7´s holder and for the cable grommets with
the cables to accumulator and glow plug clip. Mount the PCB so that the screws
for the lid at the box come in perfectly on the topside of the PCB. Otherwise
difficulties can arise with the transistors T7-T9. Fit in the PCB on suitable
height. Mark the hole and drill for T7-T9 in the lid just opposite the current
switch. Pull the wire to accumulator and glow plug clip through the cable
grommets and solder it in the PCB. Screw the PCB with the power-transistors
in the box. NB the mica washer between transistor and box. Solder on the
wire at the current switch. Nota bene that the switches both pole should
be parallel connected. Solder directly the light-emitting diodes cathode
side (that with the bevelling) on the current switch towards the wire down
to the PCB. Cut short the light emitting anode side and solder it to the
wire from the PCB. Drill a hole, Ø 5 mm, in the boxs lid just in front
the potentiometers screw drivers track. Thread a one bit of brass pipe with
the outer diameter 5 mm and the length 35 mm into the hole in the lid and
mount it. Centre the pipe with a screwdriver and push it to the potentiometer.
Then glue the pipe with epoxy-glue towards the lid. Now you can adjust the
potentiometer in a simple way with a screwdriver. It is an advantage that
nobody unauthorized can adjust the driver. It could be happen if a potentiometer
with wheel will be used. On the outside of the box you cutting of the plus
wire to the accumulator in the cable (flex) and mounting the fuse holder
and the fuse.
Testing
• Testing with a light bulb
Connect a light bulb 6 V 40 W (headlight) to the glow plug clip. Turn R3 fully anti-clockwise. Turn on the current switch. Connect the glow plug driver to accumulator 12 V (NB! Cannot be driven on power supply due to the big pulse current). Turn R3 clockwise and check that the lamp can shine with different intensity and that the intensity increases when R3 is turned clockwise. You hear a weak hum from lamp and glow plug dependence on the pulse current.
• Testing with a glow plug
Set the current switch in
the position on. Turn R3 fully anticlockwise. Connect the clip to a glow
plug. Turn R3 clockwise to appropriate glowing. Blow on the plug and check
that the light emitting diodes intensity increase when the plug cools. The
glow plug driver is now ready for use. To the greatest extend possible, always
adjust the colour at the plug so that it get dark red. It shall not shine!
Using
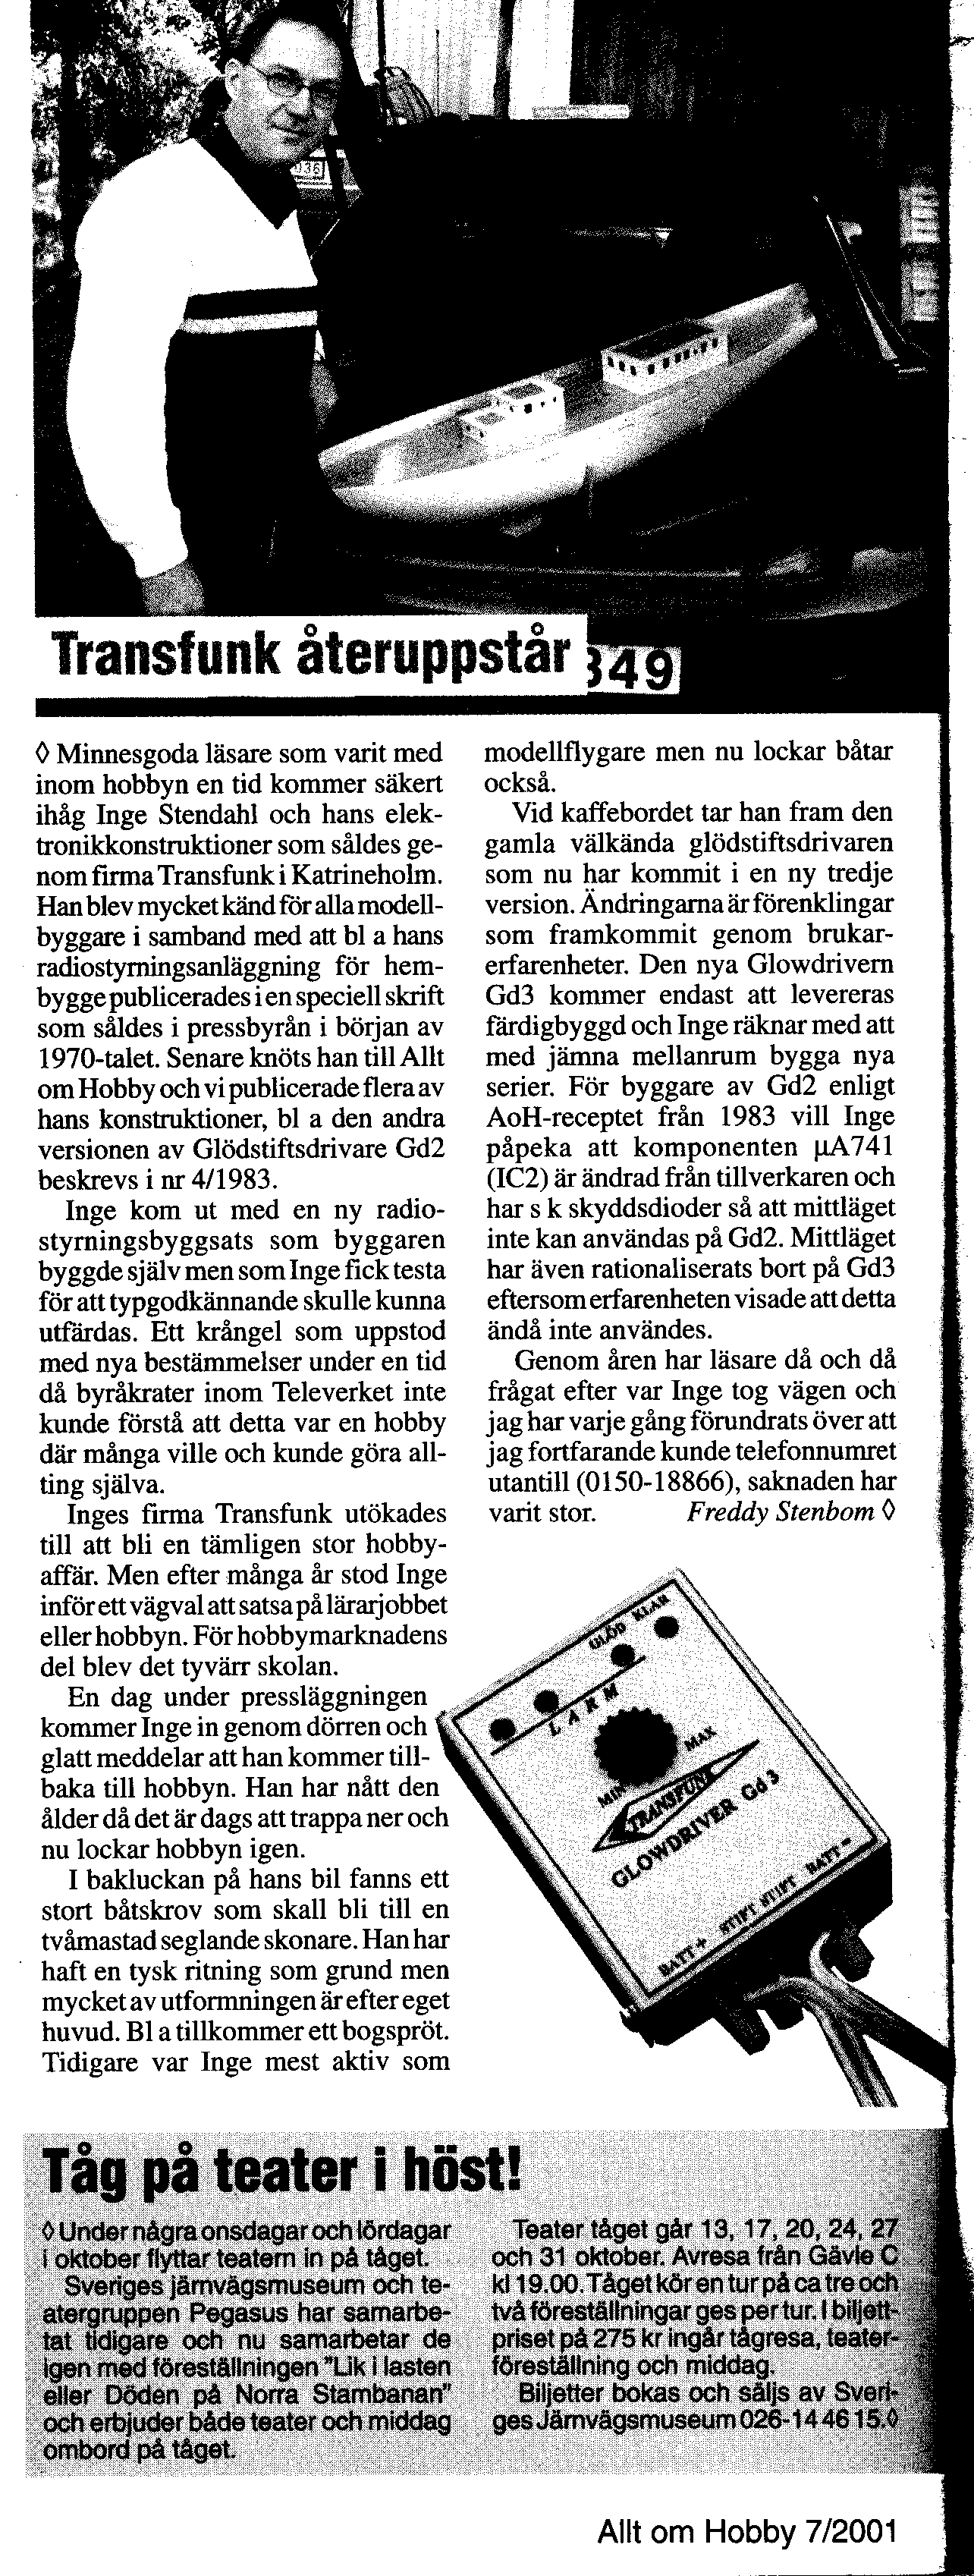
Always begin with to put the switch on before the plug is connected. The switch is not dimensioned for to open the glow current, but shall function only as a protection for the electronics and the fuse when you put away the clip. When a new plug shall been used, first turn R3 fully anti-clockwise for to not the plug shall get to much current before the glowing has been adjusted. Adjust the plugs glowing through to turn R3 clockwise. The glow plug driver GD 2, s 24 - 25. Mini glow driver for 6 V, s 32 - 33. Sorry, only in Swedish. The glowdriver GD 3 in a new and ready-built version from Inge Stendahl, Transfunk.